Magnus Mickelsson shares his ideas on how to make webservices work decently enough when you cannot avoid the heavy stuff defined by the standards. Learn how to set up a simple webservice and encrypt the information being sent over it.
 I have issues with Webservices. As you might not remember even if you read it, I wrote an article for PNEHM a while back about how we could avoid the madness of how Webservices used to be created and configured (the article was in Swedish back then): http://www.citerus.se/post/220208-en-titt-p-xfire. Using a framework called XFire, we could use a simple Javabean as a service and avoid all the fluff that was needed to publish a service and create a dynamic client to connect to it – without for instance generating a bunch of classes via a WSDL.
Since then, some of the things that used to make XFire special have been adopted as the standard way of doing things, which is really nice. However, there are still annoyances and headaches associated with making Webservices working easily.
Given a free choice, I would suggest that the reader stay away from all the “heavy” things defined by the standards and just go along the route of REST based services, secured on URL/resource level via HTTPS and normal web session login. Sometimes however, the choice is not yours, so you need to get along with whatever is chosen for you.
This small article is about such a time, making something work decently enough. In this case, it’s about setting up a simple Webservice and securing the communication to it via WSSecurity – what we’ll do is set a timestamp and signature on SOAP messages, and encrypt the information being sent. The client side should be set up to have the capability to communicate with such a Webservice, and do some serious logging of what’s being transferred – so we can actually tell if the messages have been encrypted or not.
My framework of choice for this, is the evolution of the old XFire framework – CXF. It makes (dynamic) service/client creation a breeze, and also allows for adding logging and security in an easy enough way for me to endure it. CXF can’t do all of this on its own though, it uses the open-source WSS4J project to provide WSSecurity functionality.
So, what do we need to get started?
First of all, we need encryption keys if the communication is supposed to be decently secure. If you don’t know much about public/private keys, certificates and their role in WSSecurity, take a look at this introduction:
http://cxf.apache.org/docs/ws-security.html
We want to generate keys for both the client and for the server, and they should each have their own keystore. We also want to establish mutual trust between the server and the client, meaning that we want the keystore of the client to know and trust the server’s signature, and vice versa.
The link above describes this scenario quite well.
The actual commands to make things work are run using a shell script called setup-keystore.sh (or use the .bat file) inside the sample zip file, so you don’t have to type it all out. There are however already generated keystores available, to make things work more easily.
(See http://www.sslshopper.com/article-most-common-java-keytool-keystore-commands.html for a good listing of keytool operations.)
After having created the certs, we now need to create a basic Webservice to use – and to configure it the way we want it.
This is the code of the Webservice:
/**
* @see se.citerus.wssecurity.TheService
*/
@WebService(endpointInterface = "se.citerus.wssecurity.TheService")
public class TheServiceImpl implements TheService
{
@Override
public String sayHello(String name)
{
return "Hello " + name + "!";
}
}
.. implementing this interface:
@WebService
public interface TheService
{
String sayHello(String name);
}
Yikes, such an enterprise project right there.
So, now we have the Webservice – what about the client?
// Configure Spring
XmlBeanFactory factory = new XmlBeanFactory(new ClassPathResource("client-context.xml"));

// Get a handle to the service via CXF generated client
TheService helloService = (TheService) factory.getBean("service");
System.out.println("Message received: " + helloService.sayHello("Blahonga Blahonga"));
This is when the observant reader realizes that this little example is actually using Spring for configuring CXF. This is for two reasons; partly because the old article also used Spring, partly because I figured it would be more relevant to see this example in a context that’s not just CXF on its own – even though configuring this with just CXF in plain Java is quite doable.
- Anyway, as we’re trying to do WSSecurity configuration – the Spring configuration for that is going to require some explaining. To secure the communication, we need to do the following things before it will work the way we want it to:
- Configure CXF to add interceptors to the SOAP communication call stack, applying WSSecurity (via WSS4J) to the message exchange.
Add the keystores containing our generated keys to the solution, and make WSS4J aware of them. - Define what the WSS4J framework should do about the messages we send.
First, let’s have a look at the server-side configuration. We’ll package the Webservice in a war archive, which means that we need a web.xml descriptor:
 <context-param>
        <param-name>contextConfigLocation</param-name>
        <param-value>/WEB-INF/applicationContext.xml</param-value>
    </context-param>
    <listener>
        <listener-class>org.springframework.web.context.ContextLoaderListener</listener-class>
    </listener>
    <servlet>
        <servlet-name>CXFServlet</servlet-name>
        <servlet-class>org.apache.cxf.transport.servlet.CXFServlet</servlet-class>
        <load-on-startup>1</load-on-startup>
    </servlet>
    <servlet-mapping>
        <servlet-name>CXFServlet</servlet-name>
        <url-pattern>/*</url-pattern>
    </servlet-mapping>
We’re basically just saying here to use Spring, and refer to a configuration file for Spring to use that we’ll review in a moment.
We also configure CXF’s Servlet for receiving Webservice requests, and map all incoming requests to use the CXF Servlet.
The below Spring XML configuration sets up the Webservice:
    <import resource="classpath:META-INF/cxf/cxf.xml"></import>
    <import resource="classpath:META-INF/cxf/cxf-extension-soap.xml"></import>
    <import resource="classpath:META-INF/cxf/cxf-servlet.xml"></import>

    <!-- Define the webservice doing Hello World in a pretty secure way :o -->
    <jaxws:endpoint implementor="se.citerus.wssecurity.TheServiceImpl" address="/HelloWorld">
         <jaxws:outinterceptors>
             <ref bean="WSSecurityServiceResponseInterceptor"></ref>
         </jaxws:outinterceptors>
         <jaxws:ininterceptors>
             <ref bean="WSSecurityServiceRequestInterceptor"></ref>
         </jaxws:ininterceptors>
      </jaxws:endpoint>
We import the Spring bean declarations that CXF requires, and then we define our Webservice as a JaxWS endpoint.
Not too bad. However, the configuration refers to two interceptors – and this is where it gets a bit confusing.
The interceptor definitions look like this:
 <!-- Interceptor for decrypting and validating the signature of the request -->
   <bean id="WSSecurityServiceRequestInterceptor" class="org.apache.cxf.ws.security.wss4j.WSS4JInInterceptor">
       <constructor-arg>
           <map>
               <entry key="action" value="Timestamp Signature Encrypt"/>
               <entry key="signaturePropFile" value="keystore.properties"/>
               <entry key="decryptionPropFile" value="keystore.properties"/>
               <entry key="passwordCallbackClass" value="se.citerus.wssecurity.ServerPasswordCallback"/>
           </map>
       </constructor-arg>
   </bean>

   <!-- Interceptor for timestamping, signing and encrypting the response -->
   <bean id="WSSecurityServiceResponseInterceptor" class="org.apache.cxf.ws.security.wss4j.WSS4JOutInterceptor">
       <constructor-arg>
           <map>
               <entry key="action" value="Timestamp Signature Encrypt"/>
               <entry key="user" value="helloService"/>
               <entry key="signaturePropFile" value="keystore.properties"/>
               <entry key="encryptionPropFile" value="keystore.properties"/>
               <entry key="encryptionUser" value="useReqSigCert"/>
               <entry key="passwordCallbackClass" value="se.citerus.wssecurity.ServerPasswordCallback"/>
               <entry key="signatureParts" value="{Element}{http://docs.oasis-open.org/wss/2004/01/oasis-200401-wss-wssecurity-utility-1.0.xsd}Timestamp;{Element}{http://schemas.xmlsoap.org/soap/envelope/}Body"/>
               <entry key="encryptionParts" value="{Element}{http://www.w3.org/2000/09/xmldsig#}Signature;{Content}{http://schemas.xmlsoap.org/soap/envelope/}Body"/>
               <entry key="encryptionSymAlgorithm" value="http://www.w3.org/2001/04/xmlenc#tripledes-cbc"/>
           </map>
       </constructor-arg>
   </bean>
Did I lose you there? If not, let’s go through what this really means.
We use two classes from the CXF WSSecurity API to create two Spring beans, which also happen to be interceptors that can be added to the communication stack of the dynamic Webservice, in this case on the server side.
The interceptor stack receives incoming calls to the wrapped service, and can do things when that call is made. The image below shows such a scenario.
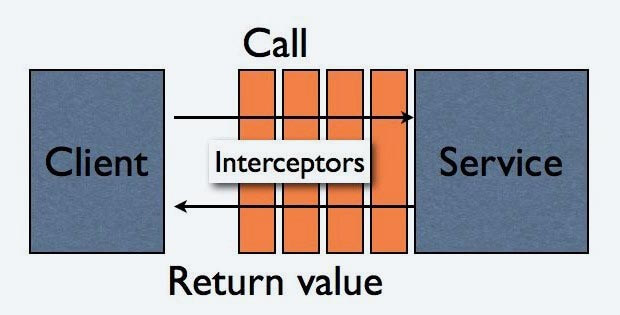
The interceptor for inbound traffic is responsible for decrypting, checking timestamp and message signature. The one for outbound traffic adds timestamp, signature and encrypts the message using the tripple DES algorithm.
The timestamps add the behaviour that messages expire after a set time (default in WSS4J version 1.5.9 seems to be 300 seconds from what I could see in the code), thus reducing the risk of some malicious person intercepting messages to be replayed with some modifications later. If the message takes longer than 300 seconds to be delivered, the receiving side will respond with an error.
Signing a message is done to guarantee the message is from a certain trusted party, and is accomplished via creating a signature generated using the private encryption key of the sender. We have to give the interceptors a reference to a callback for verifying the private password used when signing the message, so the client and server can be sure that they are in fact not talking to an impostor.
This is set with the passwordCallbackClass property in the XML configuration. The passwords used in the respective callback correspond to the key passwords from when the keystores were created. A keystore password and a key password are quite different things, and the callbacks deal with the key passwords. WSS4J needs to know about the keystore passwords to unlock the keystores, however – but that is accomplished via the property files.
Read more about the interceptors in CXF here: http://cxf.apache.org/docs/interceptors.html
The interceptors delegate the WSSecurity handling to the WSS4J library, which we’ll set up using the keystore.properties file on the server side:
org.apache.ws.security.crypto.provider=org.apache.ws.security.components.crypto.Merlin
org.apache.ws.security.crypto.merlin.keystore.type=jks
# Service keystore password
org.apache.ws.security.crypto.merlin.keystore.password=service
# Service keystore certificate alias
org.apache.ws.security.crypto.merlin.keystore.alias=helloService
org.apache.ws.security.crypto.merlin.file=serviceKS.jks
We basically use the certificate alias we defined when we created the server-side keystore, the password required to access the keystore, the name of the keystore file and the type of it.
So, we’re done setting up the server-side, let’s move on to the client. As you remember from the client code that was shown earlier, we refered to a Spring configuration file for setting up the client:
XmlBeanFactory factory = new XmlBeanFactory(new ClassPathResource("client-context.xml"));
The contents of this client-context.xml file looks like this:
    <!-- The client bean definition -->
    <bean id="client" class="se.citerus.wssecurity.WSClient" factory-bean="clientFactory" factory-method="create"/>

    <!-- Webservice client factory bean, adds interceptors to the communication -->
    <bean id="clientFactory" class="org.apache.cxf.jaxws.JaxWsProxyFactoryBean">
        <property name="serviceClass" value="se.citerus.wssecurity.TheService"/>
        <!-- Where we find the Webservice to connect to -->
        <property name="address" value="http://localhost:8080/ws_security/HelloWorld"/>
        <property name="inInterceptors">
            <list>
                <ref bean="WSSecurityResponseInterceptor"/>
            </list>
        </property>
        <property name="outInterceptors">
            <list>
                <ref bean="WSSecurityRequestInterceptor"/>
            </list>
        </property>
    </bean>

  <!-- Interceptor that will add a timestamp, a signature, and encrypt the message using triple DES -->
    <bean id="WSSecurityRequestInterceptor" class="org.apache.cxf.ws.security.wss4j.WSS4JOutInterceptor">
        <constructor-arg>
            <map>
                <entry key="action" value="Timestamp Signature Encrypt"/>
                <entry key="user" value="client"/>
                <entry key="signaturePropFile" value="client.properties"/>
                <entry key="encryptionPropFile" value="client.properties"/>
                <entry key="encryptionUser" value="helloService"/>

                <!-- The class implementing the client password verification callback -->
                <entry key="passwordCallbackClass"
                       value="se.citerus.wssecurity.ClientPasswordCallback"/>
                <entry key="signatureParts"
                       value="{Element}{http://docs.oasis-open.org/wss/2004/01/oasis-200401-wss-wssecurity-utility-1.0.xsd}Timestamp;{Element}{http://schemas.xmlsoap.org/soap/envelope/}Body"/>
                <entry key="encryptionParts"
                       value="{Element}{http://www.w3.org/2000/09/xmldsig#}Signature;{Content}{http://schemas.xmlsoap.org/soap/envelope/}Body"/>
                <entry key="encryptionSymAlgorithm" value="http://www.w3.org/2001/04/xmlenc#tripledes-cbc"/>
            </map>
        </constructor-arg>
    </bean>

    <!-- Interceptor that will decrypt the response, and verify the timestamp and signature -->
    <bean id="WSSecurityResponseInterceptor" class="org.apache.cxf.ws.security.wss4j.WSS4JInInterceptor">
        <constructor-arg>
            <map>
                <entry key="action" value="Timestamp Signature Encrypt"/>
                <entry key="signaturePropFile" value="client.properties"/>
                <entry key="decryptionPropFile" value="client.properties"/>
                <!-- The class implementing the client password verification callback -->
                <entry key="passwordCallbackClass"
                       value="se.citerus.wssecurity.ClientPasswordCallback"/>
            </map>
        </constructor-arg>
    </bean>
Since you saw similar definitions for the server with regards to the interceptors, I assume it’s not confusing anymore.
We basically say the same thing as for the server, we point out the properties of the WSSecurity configuration, and how the messages should be handled – timestamped, signed and encrypted using triple DES.
The properties needed by WSS4J are defined in the client.properties file, which looks like this:
org.apache.ws.security.crypto.provider=org.apache.ws.security.components.crypto.Merlin
org.apache.ws.security.crypto.merlin.keystore.type=jks
# Password of the client keystore
org.apache.ws.security.crypto.merlin.keystore.password=client
# Client keystore certificate alias
org.apache.ws.security.crypto.merlin.keystore.alias=client
org.apache.ws.security.crypto.merlin.file=clientKS.jks
Pretty similar to the server side, right?
We’ll also add logging the communication between client and server, but using Java code on the client. This could just as easily be injected via Spring XML, just showing another way to add interceptors to the CXF call stack.
Client client = ClientProxy.getClient(helloService);

// Add logging interceptors to trace the request+response XML
client.getInInterceptors().add(new LoggingInInterceptor());
client.getOutInterceptors().add(new LoggingOutInterceptor());
Once again, we use the interceptor concept; adding two standard interceptor classes existing within CXF to the call stack.
Now we have all the pieces in place to get this working. If you want to try this out for yourselves without actually writing any code, feel free to download the example code here.
The code has been tested on JBoss 5.1.0 GA, Glassfish v3, Jetty 7.3.0 and Tomcat 7.0.8. It builds using an included Ant-script, or via the IntelliJ project files.
Go to the wssecurity directory, and run “ant -projecthelp” to see the available build targets for Ant. Just run “ant” without arguments to create a deployable WAR archive.
Deploy the WAR to an application server of choice, and ensure that the serviceKS.jks file is in the “start directory” of the application server*. Or, you could modify the path to it in the property file and just place the keystore whereever you’d like.
The client is started using the Ant target “run-client” in the ws-security-client directory.
The reader should note, that this is not the only way to solve this problem. An option might for instance be to have a look at Spring Web Services: http://static.springsource.org/spring-ws/sites/1.5.
I hope this little exercise was useful, if not I hope it’s because you’re already using Webservices in a more pragmatic and easy way – and in that case I’d like you to share your secrets with me. 🙂
* = Start directories:
Glassfish = (installation path)/glassfishv3/glassfish/domains/domain1/config/
Tomcat = (installation path)/bin/
Jetty = (installation path)/
JBoss = (installation path)/bin/